SharePoint Services 3.0 creates its own SQL instance which needs to be backed up. Here are a couple of steps you can take to do a manual back up and purge older backups.
Step 1: Create a batch file and setup a task on the server that you are attempting to backup.
cd %COMMONPROGRAMFILES%\Microsoft Shared\web server extensions\12\BIN
stsadm.exe -o backup -directory "d:\Backup Sharepoint" -backupmethod full
echo completed
It simply changes the directory to "%COMMONPROGRAMFILES%\Microsoft Shared\web server extensions\12\BIN" and runs stsadmn.exe. Note: The directory this is saving the backup to is "d:\Backup Sharepoint". Follow the instruction from here if you run into any snags.
Step 2: Once you've tested your backup task you can add a script to delete folders older than 10 days using VBS. Here is an example from here: http://windowsxp.mvps.org/wshdelfolder.htm
Create a vbs file called deloldfolders.vbs and save it in the same directory as your backupsharepoint.bat. Here is the code for it.
'DelFolder.vbs - December 1, 2005
'Ramesh Srinivasan
Dim i, fso, f, f1, sf, BasePath, CalcResult, fNameArray()
BasePath = "d:\Backup Sharepoint"
Set fso = CreateObject("Scripting.FileSystemObject")
Set f = fso.GetFolder(BasePath)
Set sf = f.SubFolders
For Each f1 in sf
CalcResult = DateDiff("d",f1.DateCreated,Now)
if CalcResult > 10 then
ReDim preserve fNameArray(i)
fNameArray(i) = f1.Name
i = i + 1
end if
Next
For Each fName in fNameArray
FSO.DeleteFolder(BasePath & "\" & fName)
Next
Then add this line to the end of your backupsharepoint.bat.
cscript.exe c:\deloldfolders.vbs
So now you should have a task that run backupsharepoint.bat which will backup the databases and purge older backups.
Sometimes you get an orphaned service entry that needs to be manually deleted. It's a pretty painless process via the command line. Here is the command...
If you have WSUS setup to use an express version of SQL, you will need to run the cleanup process regularly. You can kick it off manually by opening the "Windows Update Servies" MMC and going to "Options" then "Server Cleanup Wizard". The first time you run it, it may take a while to complete. Use this script and schedule it to automate. Check here for details. http://gallery.technet.microsoft.com/ScriptCenter/en-us/fd39c7d4-05bb-4c2d-8a99-f92ca8d08218
Here is text from the article:
"This script performs the cleanup tasks done by the WSUS cleanup wizard. Because it is a script, it can be automated (for example, via the Windows Task Scheduler). It also provides extended support for computer cleanup, allowing one to specify the number of days of not hearing from the computer before cleanup (default is 30 days), and to optionally skip deletion of computers that are still in Active Directory Directory Services (to avoid accidently removing computers that are still around but having trouble contacting the server). We recommend also performing SQL defragmentation sample script as part of WSUS cleanup.
This script will run on any machine on which both Windows PowerShell and WSUS are installed. This script must be run from an account that has administration rights to the WSUS server. This script can also be adapted to run from a remote machine which has Windows PowerShell and the WSUS remote console installed changing the GetUpdateServer() call to GetUpdateServer(servername, true|false), where servername is the name of the remote WSUS server, and true|false refers to the use of SSL to make the connection. This script takes awhile to run, so be patient."
I ended up switching the path of a network share that I had been synchronizing offline files with. It kept giving me an error stating "The specified network file is no longer available". Even though I turned off offline files and renabled them, it still kept trying to synchronize this old share. I even went through the registry and updated any old paths.
To fix this your best bet is to re-initialize the offline files cache and database. An easy way of doing this is through the registry. Create the following DWORD.
Sometimes you want to know what is eating up space on your drives. In the past I've utilized "Folder Size" to accomplish this task. It would list folder sizes as a separate column within Explorer. It was easy to control the service on the fly through a batch file. Well Windows Vista / 7 came along and ruined my fun. Microsoft has changed how developers can interface with explorer, so I can no longer utilize Folder Size. That's not cool. So here are a few free alternatives we can use to accomplish folder sizing / disk space usage. Maybe SP1 will fix this issue.
Is your Windows 7 box locking out your accounts? Have you recently changed any of your passwords? Credential Manager could be the culprit. Just type Credential Manager from the start menu and select it. Make sure to clear out any stored credentials or update your passwords. If you check your system event logs you should see the following warning...
Source: Security-Kerberos
Event ID: 14
'The password stored in Credential Manager is invalid. This might be caused by the user changing the password from this computer or a different computer. To resolve this error, open Credential Manager in Control Panel, and reenter the password for the credential your account"
If this is present, check your Credential Manager settings.
I happened to be running Process Monitor to track down some disk writes on my system. Turns out zlclient is writing to C:\WINDOWS\Internet Logs\tvDebug.log fairly often. Here is a simple way to disable the debug log (if you don't need it).
1. Hold down Ctrl + Shift and right click the zonealarm icon.
2. Choose "Set debug level".
3. Under Debug catagories select off, and hit OK.
After that you should be all set! Oh BTW, if you are in need of a great free personal firewall I highly recommend Zonealarm.
Here is a prank we pulled on a co-worker about a year or so ago. He was asking for a PS3 as a wedding gift. We happened to get our hands on a PS3 box... hilarity ensues (well, I thought it was funny).
Hi everyone! Sorry for the long hiatus. Between work and life stuff, this blog has gathered some dust. Hopefully I can get some helpful posts put up soon. Have a great day everyone!
Script: Delete a folder from every users "Network Share" A.K.A. WKSP
Hey everyone! Sorry for the hiatus. Here is a little script I put together to delete all the "My Music" folders under WKSP. Seems like a simple enough task, until you have to do it. This script should save you a ton of time (hopefully).
Here is the code:
@echo off&setlocal pushd c:\WKSP for /f "delims=" %%a in ('dir /B/S/AD my*music') do del /Q /F /S "%%a\*.*" popd
Save it as a .bat file and you are good to go!
Remember to test the script! Just add an echo before the delete command. You can see the example in red below...
@echo off&setlocal pushd c:\WKSP for /f "delims=" %%a in ('dir /B/S/AD my*music') do echodel /Q /F /S "%%a\*.*" popd
Sorry I've been slammed at work and such so I have not had much time to post.
Here is the 2nd part of the single user backup for Lotus Notes. Mind you it is nothing spectacular (but it can be very useful). It is a simple VBS I modified from the Microsoft script center. Here is the code...
Const ForReading = 1 Const ForWriting = 2
set re=new regexp
'Opens notes.ini within the backup folder that was 'created in the first script Set objFSO = CreateObject("Scripting.FileSystemObject") Set objFile = objFSO.OpenTextFile("C:\notesbackup\notes.ini", ForReading)
'Reads all the lines of the file and looks for "Directory=" strText = objFile.ReadAll re.pattern="Directory=.+\n" objFile.Close
'Replaces the Directory= with your desired location. strNewText = re.Replace(strText, "Directory=C:\Program Files\lotus\notes\data" & vbCrLF & "")
'Closes up the notes.ini Set objFile = objFSO.OpenTextFile("C:\notesbackup\notes.ini", ForWriting) objFile.WriteLine strNewText objFile.Close
So there it is. Post a comment if you need any help!
Here is a script I created to backup a users profile within Lotus Notes. It's a quick and dirty but you should get the idea.
Save this into a batch (.bat extension) file. Make sure the user can utilize reg.exe. By default it is a part of Windows XP and 2000.
I suggest running something like this at the system startup. This will avoid any corruption that may happen from the user opening notes.
I have a "replace.vbs" that updates the notes.ini with the correct install location (in case you are moving to a new box). I will post it later.*Update: You can find the replace.vbs here Single user backup script for Lotus Notes Part 2.
@ECHO OFF
REM This creates the C:\NotesBackup\data directory MD C:\NotesBackup\data\
REM Takes us to the root of C:\ c: cd\
REM Queries registry for the lotus notes key. REM Determines where the files we need to backup are located. FOR /F "tokens=2* delims= " %%A IN ('reg query HKLM\Software\lotus\notes /v Path') DO xcopy "%%Bdata\*.ID" C:\NotesBackup\data\ /Y /D FOR /F "tokens=2* delims= " %%A IN ('reg query HKLM\Software\lotus\notes /v Path') DO xcopy "%%Bdata\notes.ini" C:\NotesBackup\data\ /Y /D FOR /F "tokens=2* delims= " %%A IN ('reg query HKLM\Software\lotus\notes /v Path') DO xcopy "%%Bnotes.ini" C:\NotesBackup\ /Y /D FOR /F "tokens=2* delims= " %%A IN ('reg query HKLM\Software\lotus\notes /v Path') DO xcopy "%%Bdata\Desktop6.ndk" C:\NotesBackup\data\ /Y /D FOR /F "tokens=2* delims= " %%A IN ('reg query HKLM\Software\lotus\notes /v Path') DO xcopy "%%Bdata\bookmark.nsf" C:\NotesBackup\data\ /Y /D FOR /F "tokens=2* delims= " %%A IN ('reg query HKLM\Software\lotus\notes /v Path') DO xcopy "%%Bdata\names.nsf" C:\NotesBackup\data\ /Y /D\
REM I will post "replace.vbs" later. This vbs allows us to update the notes.ini with the proper location. REM wscript h:\replace.vbs
REM This makes another folder. MD g:\notesbackup\
REM Copies c:\Notesbackup to another location. xcopy c:\Notesbackup\*.* g:\Notesbackup /Y /E
I kept receiving errors regarding my sitemap after I switched to blogger beta. I was using atom and apparently beta uses a different version. Until they resolve this here is a great work around using rss. I assume you have already verified your site via the webmaster tools....
1. Go to the google webmaster tools and click the "Sitemaps" tab. 2. Delete the old atom submission if you have one. 3. Click "Add a Sitemap". 4. Once you get to the "Add Sitemap" page select "Add General Web Sitemap" on the choose type drop down box. 5. Under "3. My Sitemap URL is:" add your site (don't forget the rss.xml). Example: http://yourblogname.blogspot.com/rss.xml
How To Create a Universal Ghost Image. This is my guide to building a "Universal" (compatible with most HALs) Ghost Image. I will revise as needed.
Hopefully this will cover everything you need to create your own Universal Image. I have tried to cover all the issues I have run into. With the use of "MYSYSPREP", my image names the PC via it's serial cnumber and switches the HAL based on the model. If you have any questions or suggestions please feel free to comment.
Note*: You need to make sure you are using the Corporate version of Windows XP. If you are using a regular OEM copy of Windows you will have issues using SYSPREP. I believe after you SYSPREP an image twice it requires you to re-validate or something.
Note*: Make sure you do not install "Windows Genuine Advantage". If you have, remove it. Here are the instructions on how to... http://support.microsoft.com/kb/921914
Okay, so lets get started.. 1. Do a clean install of Windows XP.
I usually start building the image on my slowest model PC. I have found that this really does not matter as long you change the HAL to ACPI.
Try to avoid installing any unnecessary drivers and make sure to utilize the ".inf" for the drivers that are required.
Optional: I usually create a backup image right after I install windows. This saves me time if I have to start from scratch
2. Change the HAL to ACPI.
Open the I386 folder located on your XP SP2 cd.
Open the SP2.CAB.
Extract halacpi.dll (not halaacpi.dll) to a temporary folder and rename it to hal.dll.
Extract ntkrnlpa.exe and ntoskrnl.exe to the same temporary folder.
Move all three files to the system32 folder under your windows directory. Say yes to replace files.
Reboot
You have now switched your PC to ACPI! 3. Apply all critical patches released by Microsoft. Again, avoid installing Windows Genuine Advantage.
4. Create a configuration checklist and follow it.
Note*: One of the interesting features they added to XP SP2 is the fact that when you SYSPREP your image it will copy the local admin profile to the default profile. I have mixed feeling about this but I have made it work for me. There is a patch to get around it if you need it
Here is a generic checklist. Add or remove details as needed...
_Clear take a tour
_Clear .net passport
_Remove MSN Explorer
_Remover Internet Messenger
_Display Setting
_1024 x 768
_Windows Classic Theme
_Set wall paper
_Set screen Saver
_Set power scheme
_Disable hibernation
_Set Taskbar settings
_Set internet option
_Empty Recycle Bin
etc...
5. Install and configure necessary software.
I try to document whatever I have installed in a change log. That way we can keep track of changes.
Make sure to trim your drivers down. Anytime you download drivers they usually contain a folder with what is required for windows... files with the .inf extension. Here is a screen shot of an audio driver I have.
9. You can create your own sysprep.inf by running c:\sysprep\setupmgr.exe. It will ask you a series of questions related to what you want sysprep to do. Or you can use the sysprep.inf below.
Note*: Anything I put in bold and red do not include in your sysprep.inf.
[Unattended] ;This tell sysprep to do an unattended setup. unattendedMode=FullUnattended OemSkipEula=Yes ;OemPnPDrivers refers to the "C:\drivers" folder you created. I trimmed this down a bit. OemPnPDriversPath=Drivers\Snd64;Drivers\Vid6400;Drivers\Vid62;Drivers\Vid6;Drivers\mdm62;Drivers\mdm6;Drivers\snd62;Drivers\MD64;Drivers\Modem64;Drivers\TPM;Drivers\QL64;Drivers\FING;Drivers\SATA ;InstallFilesPath refers to the root in which you store everything... drivers etc... InstallFilesPath=C:\ ConfirmHardware=No OverwriteOemFilesOnupgrade=No DriverSigningPolicy = Ignore oempreinstall=yes updateInstalledDrivers=Yes
[GuiUnattended] ;Set your local admin password here AdminPassword=****** AutoLogon=No AutoLogonCount=0 OEMSkipRegional=1 TimeZone=35 OemSkipWelcome=1s
[UserData] ;Put your Product Key here. ProductKey=xxxx-xxxx-xxxx-xxxx-xxxx FullName="xxx" OrgName="xxx" ;This is a special added feature that comes with MYSYSPREP. ;You can have your PC named by it serial number.;Below you see that I have it type out JAX in front of the Serial Number ComputerName=JAX%SerialNo%
[Identification] ;Here you can have the computer join the domain.;Enter the crudentials of a user that has rights to do this. JoinDomain=xxx DomainAdmin=xxx DomainAdminPassword=xxxx
Note*: I have "BuildMassStorageSection=No". This is only because I know exactly which mass storage drivers I need. If you change this option to "Yes" it will populate a huge list of storage drivers. This will make it more compatible across different hardware, but it adds a good 30 minutes to the SYSPREP process.Note*: I have included custum mass stroage drivers. This is for my Compaq laptops.
10. Once you have your sysprep.inf in place it is time to look at the "c:\sysprep\mysysprep.inf". This files contain the information needed to switch the HAL before mini setup.
Here is an example:
[Manufacturer] ;Manufacturer Name=mfg.inf
[Model] ;Model Name=model.inf ;MP model=mp.inf ;UP model=up.inf hp Compaq nc6000 (DD522AV)=up.inf HP Compaq nc6230 (PU985AA#ABA)=up.inf HP Compaq dc7600 Small Form Factor=mp.inf HP Compaq dc7100 SFF(DX878AV)=mp.inf HP d530 USDT(DG009A)=mp.infHP d530 CMT(PB600A)=mp.inf HP Compaq nc6400 (RA263AT#ABA)=mp.inf [SerialNo] ;Serial No=serial.inf
Notice you have a couple of different ways to specify the HAL. I do mine by model. You can get the model info by typing "c:\sysprep\mysysprep /smbios" from the command prompt.
Note*: Make sure you have up.inf and mp.inf in your sysprep folder.
11. Now lets backup our base image in case we need to make changes in the future. I just create an image and call it by "Something Descriptive"base. Make sure to keep a changelog and always hold onto a couple older versions of the image.
12. Time to sysprep the image. Go ahead and clean out any Temp folders and those windows update unistall etc... Make sure to clear out your recycle bin.
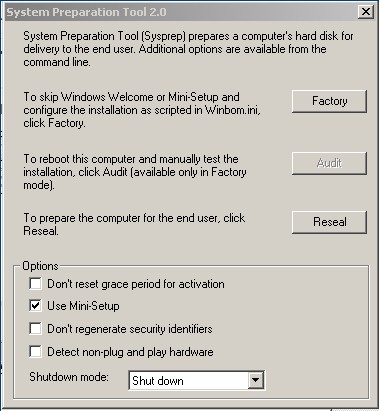
Go to your "c:\sysprep" and run mysysprep.exe. Hit OK past the warning. You should see something like this...
Go ahead and check the Use Mini-Setup box and click Reseal. Once SYSPREP is done it will shut down your PC.
13. As soon as you turn on your PC back on boot it to a Pre-Environment or use a ghost boot disk. Create an image of your machine and you should be all set.
14. Push the SYSPREP'd image to a new machine. See if it works!
Note*: SYSPREP will automatically delete itself when it completes!
Errors and what they mean.
Laptops can be the trickiest to image. Make sure you are using the proper HAL and Mass stroage drivers.
I have found that when safe mode stops atagp440.sys it is the HAL. When it stops at mup.sys it is the mass storage drivers.
How To Make Sushi. A.K.A. Beginners Guide To Sushi. Below is an e-mail I typed up for family and friends regarding sushi night. I kept everything pretty simple, nothing exotic. My wife has a fear of raw things etc...
Indeed 9/10/2006 was the day I decided to go balls to the wall against Sushi. In a word, "success". Let me recap my plan so you too can be successful... and make like 20 rolls.
The Shopping List
Mirin
Rice Wine Vinegar
Sushi Rice (Short Grain). Don't skimp, get the good stuff.
noir (Roasted Seaweed). Again don't skimp.
Sriracho Hot Sauce (It's the red bottle with the Rooster on it.) You may have to go to an Asian Grocer for this. I have seen it at walmart too.
Crabstick (In Japan it is know as a fish stick or fish cake) You can get the actual Japanese ones at the Asian Grocer.
Avocado (make sure the bloody thing is ripe. The outside should be dark and it should be a little soft. The ones they use for Sushi are the little ugly dark ones.)
Cucumber
Kikomon Soy Sauce (I like the low sodium version)
BlueBell or Helmans Mayo
Sesame Seeds (Roasted or plain)
Bamboo Mat (Crucial to roll awesome rolls).
"A Very Sharp Knife" (Any knife will do, sharpen the heck out of it)
Optional
Smoked Salmon (Don't let the look of it deceive you. This stuff is cooked and awesome. It tastes like bacon.)
Shrimp (I used this for Tempura)
Masago Smelt Roe (Fish Eggs, that Orange stuff).
Kewpie Mayo (It's like regular Mayo, just a little less greasy. Feel free to use Helmans in it's place.) I paid like $4 for this stuff.
Panco (Japanese Breadcrumb) I used this for the shrimp tempura.
As far as shopping goes, you should be able to find the majority of the stuff you need at publix. Most of this is in ethnic food section. Only a couple of items you might have to go to an Asain Grocer for (The Sriracho Hot Sauce and the Masago Smelt Roe, that's about it). BTW, don't be afraid of the Asian Grocer they are usually very helpful!
Now I set out to make a couple different types of rolls; The Philly (Crab, Cream cheese, Cucumber, Sesame Seeds, and maybe some Avocado), The Rock-and-Roll (Shrimp Tempura, Crab, Smoked Salmon, Cream Cheese, Cumber, Avocado, and Sesame Seeds) Then mix and match the rolls.... I topped the Rolls with a Kabayaki Sauce, and had some Dynamite Sauce for dipping (The recipes are below.)... They turned out awesome, even my son ate some.
Sauce Recipes.
Kabayaki Sauce
1/2 cup soy sauce
1/2 cup mirin (sweet rice wine)
1/4 cup sugar
*mix them together. That's it.
Dynamite Sauce
1/2 cup mayonnaise
2 tablespoons sriracha hot sauce
1/2 - 1 teaspoon masago smelt roe (optional)
*mixxxxx em' up
SushiRice This is the most important Step. Set aside a good 30+ minutes to spend on this. If your rice sucks, the sushi sucks. I have tried a bunch of different recipes and this one is by far the best. Do exactly what it says, do not skip any of the steps. Remember you add the Mirin and rice vinegar after you cook the rice (Trust me I have messed up plenty of sushi rice). Don't worry about the Kelp though.
Ignore the directions on the bag that the rice came from and rinse the rice only 3-5 times. The water does NOT have to run clear.
Place rice to drain in a strainer.
Drain for one hourin the winter, 30 min in the summer. (Sounds strange, but is true).
While rice is draining, combine vinegar,sugar, salt and mirin together in a separate bowl and mix well.
If using a kelp leaf,it should be about 2 in long
Wipe it lightly, cut small slits to make it look like a comb and add it to a pot along with the water.
Add rice to the pot.
Bring quickly to a boil and then reduce to a simmer (I set my burner in between low and medium).
Cover the pot and DON'T touch it until the end, NO PEEKING.
Cook for 15 minutes before removing the pot from the heat but keep the lid CLOSED.
Let rice rest for 10 min and then remove the cover.
Place in a glass dish to cool and lightly fan the rice while adding the vinegar mixture.
Mix rice gently, careful not to break it.
Sushi rice is best used at body temperature.
For Shrimp Tempura just google it... There are a few sites that tell you how the carve up the shrimp and make the batter. I used Flour, An Egg, Seasame Oil, and water. Then you roll it in the Pango and fry it. Just use regular vegetable oil to fry. Mine were kinda bland though :(. they need some salt or something.
Now lets make the rolls. Rather than me typing up a big thingy on it lets follow some links. Here are some good ones...
All data and information provided on this site is for informational purposes only. adminbromo.blogspot.com makes no representations as to accuracy, completeness, currentness, suitability, or validity of any information on this site and will not be liable for any errors, omissions, or delays in this information or any losses, injuries, or damages arising from its display or use. All information is provided on an as-is basis.