How To Create a Universal Ghost Image.
This is my guide to building a "Universal" (compatible with most HALs) Ghost Image. I will revise as needed.
Hopefully this will cover everything you need to create your own Universal Image. I have tried to cover all the issues I have run into. With the use of "MYSYSPREP", my image names the PC via it's serial cnumber and switches the HAL based on the model.
If you have any questions or suggestions please feel free to comment.
Note*: You need to make sure you are using the Corporate version of Windows XP. If you are using a regular OEM copy of Windows you will have issues using SYSPREP. I believe after you SYSPREP an image twice it requires you to re-validate or something.
Note*: Make sure you do not install "Windows Genuine Advantage". If you have, remove it. Here are the instructions on how to... http://support.microsoft.com/kb/921914
Okay, so lets get started..
1. Do a clean install of Windows XP.
- I usually start building the image on my slowest model PC. I have found that this really does not matter as long you change the HAL to ACPI.
- Try to avoid installing any unnecessary drivers and make sure to utilize the ".inf" for the drivers that are required.
- Optional: I usually create a backup image right after I install windows. This saves me time if I have to start from scratch
- Open the I386 folder located on your XP SP2 cd.
- Open the SP2.CAB.
- Extract halacpi.dll (not halaacpi.dll) to a temporary folder and rename it to hal.dll.
- Extract ntkrnlpa.exe and ntoskrnl.exe to the same temporary folder.
- Move all three files to the system32 folder under your windows directory. Say yes to replace files.
- Reboot
3. Apply all critical patches released by Microsoft. Again, avoid installing Windows Genuine Advantage.
4. Create a configuration checklist and follow it.
- Note*: One of the interesting features they added to XP SP2 is the fact that when you SYSPREP your image it will copy the local admin profile to the default profile. I have mixed feeling about this but I have made it work for me. There is a patch to get around it if you need it
- Here is a generic checklist. Add or remove details as needed...
- _Clear take a tour
- _Clear .net passport
- _Remove MSN Explorer
- _Remover Internet Messenger
- _Display Setting
- _1024 x 768
- _Windows Classic Theme
- _Set wall paper
- _Set screen Saver
- _Set power scheme
- _Disable hibernation
- _Set Taskbar settings
- _Set internet option
- _Empty Recycle Bin
- etc...
- I try to document whatever I have installed in a change log. That way we can keep track of changes.
- Extract "deploy.cab" to "C:\sysprep" on your image machine.
7. Download "MYSYSPREP" from here... http://jimtsay.googlepages.com/mysysprep
- extract it into the "c:\sysprep" folder.
- This is a hacked version of SYSPREP. Read the full description of it via the link. It works side-by-side with sysprep to add more robust features.
8. Create the following folder "c:\drivers". Make a subfolder for each of the required drivers for all your PCs.
Example.Make sure to trim your drivers down. Anytime you download drivers they usually contain a folder with what is required for windows... files with the .inf extension. Here is a screen shot of an audio driver I have.
c:\drivers\vid7600
c:\drivers\snd7600
c:\drivers\vid350

9. You can create your own sysprep.inf by running c:\sysprep\setupmgr.exe. It will ask you a series of questions related to what you want sysprep to do. Or you can use the sysprep.inf below.
Note*: Anything I put in bold and red do not include in your sysprep.inf.
[Unattended]Note*: I have "BuildMassStorageSection=No". This is only because I know exactly which mass storage drivers I need. If you change this option to "Yes" it will populate a huge list of storage drivers. This will make it more compatible across different hardware, but it adds a good 30 minutes to the SYSPREP process. Note*: I have included custum mass stroage drivers. This is for my Compaq laptops.
;This tell sysprep to do an unattended setup.
unattendedMode=FullUnattended
OemSkipEula=Yes
;OemPnPDrivers refers to the "C:\drivers" folder you created. I trimmed this down a bit.
OemPnPDriversPath=Drivers\Snd64;Drivers\Vid6400;Drivers\Vid62;Drivers\Vid6;Drivers\mdm62;Drivers\mdm6;Drivers\snd62;Drivers\MD64;Drivers\Modem64;Drivers\TPM;Drivers\QL64;Drivers\FING;Drivers\SATA
;InstallFilesPath refers to the root in which you store everything... drivers etc...
InstallFilesPath=C:\
ConfirmHardware=No
OverwriteOemFilesOnupgrade=No
DriverSigningPolicy = Ignore
oempreinstall=yes
updateInstalledDrivers=Yes
[GuiUnattended]
;Set your local admin password here
AdminPassword=******
AutoLogon=No
AutoLogonCount=0
OEMSkipRegional=1
TimeZone=35
OemSkipWelcome=1s
[UserData]
;Put your Product Key here.
ProductKey=xxxx-xxxx-xxxx-xxxx-xxxx
FullName="xxx"
OrgName="xxx"
;This is a special added feature that comes with MYSYSPREP. ;You can have your PC named by it serial number. ;Below you see that I have it type out JAX in front of the Serial Number
ComputerName=JAX%SerialNo%
[Display]
BitsPerPel=32
Xresolution=1024
YResolution=768
[SetupMgr]
DistFolder=C:\sysprep\i386
DistShare=windist
[Identification]
;Here you can have the computer join the domain. ;Enter the crudentials of a user that has rights to do this. JoinDomain=xxx
DomainAdmin=xxx
DomainAdminPassword=xxxx
[Networking]
InstallDefaultComponents=Yes
[Sysprep]
BuildMassStorageSection=No
[SysprepMassStorage]
PCI\VEN_8086&DEV_27C1&CC_0106 = %systemdrive%\drivers\sata\iaahci.inf ; Intel(R) 82801GR/GH SATA AHCI Controller (Desktop ICH7R/DH)
PCI\VEN_8086&DEV_27C5&CC_0106 = %systemdrive%\drivers\sata\iaahci.inf ; Intel(R) 82801GBM SATA AHCI Controller (Mobile ICH7M)
PCI\VEN_8086&DEV_2652&CC_0106 = %systemdrive%\drivers\sata\iaahci.inf ; Intel(R) 82801FR SATA AHCI Controller (Desktop ICH6R)
PCI\VEN_8086&DEV_2653&CC_0106 = %systemdrive%\drivers\sata\iaahci.inf ; Intel(R) 82801FBM SATA AHCI Controller (Mobile ICH6M)
PCI\VEN_8086&DEV_27C3&CC_0104 = %systemdrive%\drivers\sata\iastor.inf ; Intel(R) 82801GR/GH SATA RAID Controller (Desktop ICH7R/DH)
PCI\VEN_8086&DEV_24DF&CC_0104 = %systemdrive%\drivers\sata\iastor.inf ; Intel(R) 82801ER SATA RAID Controller (Desktop ICH5R)
PCI\VEN_8086&DEV_25B0&CC_0104 = %systemdrive%\drivers\sata\iastor.inf ; Intel(R) 6300ESB SATA RAID Controller
PCI\VEN_8086&DEV_2652&CC_0104 = %systemdrive%\drivers\sata\iastor.inf ; Intel(R) 82801FR SATA RAID Controller (Desktop ICH6R)
10. Once you have your sysprep.inf in place it is time to look at the "c:\sysprep\mysysprep.inf".
This files contain the information needed to switch the HAL before mini setup.
Here is an example:
[Manufacturer]Notice you have a couple of different ways to specify the HAL. I do mine by model. You can get the model info by typing "c:\sysprep\mysysprep /smbios" from the command prompt.
;Manufacturer Name=mfg.inf
[Model]
;Model Name=model.inf
;MP model=mp.inf
;UP model=up.inf
hp Compaq nc6000 (DD522AV)=up.inf
HP Compaq nc6230 (PU985AA#ABA)=up.inf
HP Compaq dc7600 Small Form Factor=mp.inf
HP Compaq dc7100 SFF(DX878AV)=mp.inf
HP d530 USDT(DG009A)=mp.inf HP d530 CMT(PB600A)=mp.inf
HP Compaq nc6400 (RA263AT#ABA)=mp.inf
[SerialNo]
;Serial No=serial.inf
Note*: Make sure you have up.inf and mp.inf in your sysprep folder.
11. Now lets backup our base image in case we need to make changes in the future. I just create an image and call it by "Something Descriptive"base. Make sure to keep a changelog and always hold onto a couple older versions of the image.
12. Time to sysprep the image. Go ahead and clean out any Temp folders and those windows update unistall etc... Make sure to clear out your recycle bin.
Go to your "c:\sysprep" and run mysysprep.exe. Hit OK past the warning. You should see something like this...
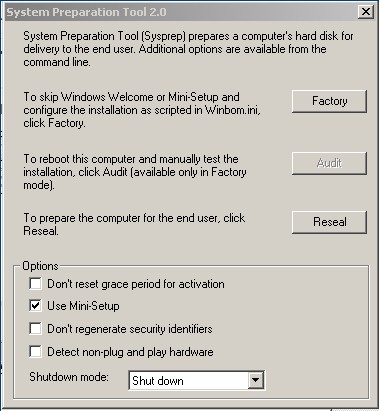
Go ahead and check the Use Mini-Setup box and click Reseal. Once SYSPREP is done it will shut down your PC.
13. As soon as you turn on your PC back on boot it to a Pre-Environment or use a ghost boot disk. Create an image of your machine and you should be all set.
14. Push the SYSPREP'd image to a new machine. See if it works!
Note*: SYSPREP will automatically delete itself when it completes!
Errors and what they mean.
Laptops can be the trickiest to image. Make sure you are using the proper HAL and Mass stroage drivers.
I have found that when safe mode stops at agp440.sys it is the HAL.
When it stops at mup.sys it is the mass storage drivers.
"Helpful Links"
Adding Drivers to your image.
http://www.microsoft.com/technet/technetmag/issues/2006/05/UtilitySpotlight/default.aspx
Thanks,
Admin Bromo
If you find this write up useful please feel free to link to it.
www.PepperDeath.com


42 comments:
Feel free to Digg this! :)
Great read! Thanks for sharing.
GREAT post. This is very thorough. I wanted to document something like this for a long time, but I'm too lazy (and I'd need to do a bit of homework!)
Thanks for the awesome post... :)
Rob
Hi,
sometimes you refer to sysprep.inf and sometimes sysprep.ini. Is this correct? or should it always be sysprep.inf?
Hi Jason,
Thanks for pointing that out. It should be ".inf". I will correct the post.
Many Thanks,
AdminBromo
Thanks for taking the time to share this info. It has great value. I'm in the process of setting up BBD 2007 to do XP deployments (yes that's right, were finally moving to XP!). I decided on BDD 2007 so that we'll be prepared when it comes time to roll out Vista (7 years from now!).
Thanks again!
Michel.
What could the issue be if when testing the UNI Image on another machine it constantly reboots? You can email me at apate@bedford.k12.va.us. Thanks!
AP
Re: AP
When I have run into this it has been because the correct "mass storage drivers" are not present. Run it in safe mode and see where it stops. Are you getting a Blue Screen? If so the stop error can give you some insight as well. What hardware are you using this on?
Thanks,
AdminBromo
It stops at the agp440.sys file in safe mode. Though the HAL type that I have is "ACPI Uniprocessor PC" on both machines (master and client). Not quite sure why, given that the HALs are the same, it would stop at that point. Any ideas? These are both Dell machines, btw.
AP
Re: AP
Sorry about the wait... My wife just started school again and I have baby sitting duty :). My suspicion is it may be the mass storage drivers. Especially if the HALs are identical. Usually blue screens can be a bit more telling via the stop error... It could be that this new model Dell needs some special SATA drivers. I would do a search for your model dell and "mass storage driver". You can also add "sysprep.inf" to your search as well. Chances are someone has run into a similar issue with the dells. You could also try and set "BuildMassStorageSection=Yes" in your sysprep.inf. It will add another 20+ mins to the build process because it adds a ton of mass storage drivers. Sadly it does not cover some of the newer hardware though. Let us know your results if you can get it to work. I know this stuff can be frustrating. Good Luck.
-Ian
AdminBromo
Re: AP
One more thing. You may want to uncheck "automatically restart" under startup and recovery options. That way it will keep the blue screen up for you to see.
-Ian
AdminBromo
Does anybody know when will a version of mysysprep come out that will work with vista?
MySysprep 1.1 has been released at http://jimtsay.googlepages.com/mysysprep. You can use wildcards for model name and serial number.
Hey,
Awesome post here by the way.
I was trying to use this method by making an image on an ACPI and push it onto a Standard PC , it doesn't work though, it just keeps rebooting after getting to the BIOS.
Any idea on how to make it work on a PC that's not a standard up or mp???
Thanks,
Prateek
Re: Michael
I haven't read too much on prepping vista. I do know that it behaves much differently than previous versions of windows. Improved boot loader and such. I probably won't be getting into it for a while.
Re: Prateek
When you create the universal image you should be setting the HAL to ACPI. This is compatible with most hardware made after 1998 (I believe). If your HAL is set to this it will come up on a MP or UP machine.. It will just be very slow. Chances are you are getting a Blue Screen and it reboots immediately. More than likely it will be your "mass storage" drivers. Look up the hardware specs for the machine. See if it has SATA or anything that would require special drivers. You could also try and set "BuildMassStorageSection=Yes" in your sysprep.inf. It will add another 20+ mins to the build process because it adds a ton of mass storage drivers. Sadly it does not cover some of the newer hardware though. You may want to uncheck "automatically restart" under startup and recovery options. That way it will keep the blue screen up for you to see... The first part of the stop error will tell you the issue.
Thanks,
Ian
AdminBromo
help!
I have implemented this method at work. The computers that I use at work are Gateway E-4100 tower and slim version, E-4500 tower and slim version, Profile5.5, Profile6. Also, I have HP dc7700 tower and slim version. The slim and tower version have the same components. I have created one image for all. The problem I am have is sometimes the drivers do not alley themselves. I have extracted every single driver from every different computer with Driver Magician. Each computer has about 70 drivers. I put them all in the sysprep.inf. I know that is a lot.However I did not know which ones to leave out. I am still within the sysprep 4096 character limit. For example, I applied my final image to the E-4100 and the video driver did not apply. I manually did it from my driver folder, which holds all the drivers. I saved that image. Before this, the image worked on all other computers. I applied the image to all of my computers and the E-4500 is now missing the video driver in device manager. These type of issues are happening to me. Could this be because my driver path is so long? Sometimes the SATA driver gets applied with a "!" and the computer has IDE. IDE driver is fine. They are both listed. Any ideas?
I'm a newbie at this and the part I am stuck on - and maybe this is so obvious to everyone else - is the Ghosting part. I have Ghost 9, 10 & 2003. With Ghost 9/10, it doesn't appear I can boot off the CD and tell it to backup/image. It seems I have to load Ghost on the PC and then image it. I don't want Ghost on every PC.
How do I do the Ghost part once I have syspreped system?
Thx - Steve swu30@hotmail.com
I dont see how your creating a universal image if your designating the drivers in advance. How is a "universal image" created on a pentium chipset going to work on a AMD chipset? Or even a Asus board w/p4HT transferred to a intel board w/core2duo?
What about when youve preloaded your nvidia drivers only to end up loading the image on a system with an ATI card? You would end up with a system thats looking for a nvidia card which will only add to the time of uninstalling those drivers and locating/installing the ATI drivers, and thats best case scenario.
Im not attacking your idea, i love the concept of a universal image, but it seems that instead of adding drivers for an undefined system (you dont know what systems you will be installing them on) you should try to remove all the data that is tied to the HAL and all the other stuff that keeps images from being universal. What would happen if you loaded a windows image that had all data linking to the hardware removed?
It would be nice if one could assign the hardware to the OS in post.
Heya,
Thanks for sharing.
I have two problems. First off all i dont know wich drivers were using because of the various pc's.
And when i restore the image. When i see the Windows XP screen it reboots. No blue screen.
Please help :)
Great info only one thing you might want to add. The Oemdriverpath statement has a limitation of like 256 characters I think so what we have done to get around that is add the driver path directly to the registry which also has its limits but they are much higher the registy key you need is
[HKEY_LOCAL_MACHINE\SOFTWARE\Microsoft\Windows\CurrentVersion]
the key is Devicepath
add your driver paths into that key and export it. You can then import it into any image you are building. What we do is create a system hidden folder on the drive called D and under that folder we have folders created 1-99 we put each driver into its own folder and have text file that we update that tells what drivers are in which folder just for our own purpose so we know where they are if we need to update them. The reason for using D and then numbers for the folder names is they take up less characters since you are still limited in the amount of chracters you can use this gives you plenty of room to grow should you need to add drivers. we are currently using I belive 55 of the 99 folders when we need to add any we just add them into the next available folder and put that in the image. The driver path is already in there so no need to change anything else windows will find the drivers.
Hi everyone
Now it is really possible. You can make generic WDS image from XP. Please check my guide: http://koti.mbnet.fi/olljanat/guides/generic_wds_image_from_xp.php
Best regards
Olli Janatuinen
Just wanted to pass on my thanks. Your integration of the AHCI SATA driver into the mass storage drivers section was a saving grace. I couldn't find the how to anywhere else. But now I am able to put another 19 new systems online with my original image. Thanks again, great info.
wow, are you the saviour of my weekend?
are the following files named correctly in your directions?
"Extract ntkrnlpa.exe and ntoskrnl.exe to the same temporary folder."
I found "ntosmnla" and "ntkmlpa" both EXEs in the locations you specified on sp2..........did you mean for them to be renamed or just copied?
Thanks for the post i found this very helpful.
The image worked great on 99% of our Hardware models.
The other 1% (Dell GX280 and Dell latitude D620) hung at the Windows Mini Setup page. This was due to a video driver issue. The resolve for this can be found here: http://hdsurvivor.blogspot.com/2007/06/sysprep-hangs-durking-mini-setup.html
Thanks again for a very helpful post.
can someone help me with this I don't understand this last part below
[Manufacturer]
;Manufacturer Name=mfg.inf
[Model]
;Model Name=model.inf
;MP model=mp.inf
;UP model=up.inf
hp Compaq nc6000 (DD522AV)=up.inf
HP Compaq nc6230 (PU985AA#ABA)=up.inf
HP Compaq dc7600 Small Form Factor=mp.inf
HP Compaq dc7100 SFF(DX878AV)=mp.inf
HP d530 USDT(DG009A)=mp.inf HP d530 CMT(PB600A)=mp.inf
HP Compaq nc6400 (RA263AT#ABA)=mp.inf
[SerialNo]
;Serial No=serial.inf
Hi,
Why do you advice against 'Windows Genuine Advantage', in relation to the subject?
Bjorn
I found a problem when doing the mini-setup. The system gives a Application Error ( setup.exe ). The error looks like a hardware problem. The problem lies with the "Telephony" Service. I had this service disabled. Before Sealing the system you should set the "Telephony" service to automatic.
If this works with other people to, post a comment please...
Dion
Can someone help me with the part of the drivers i have some doubts in that, if is possible to create a universal image putting drivers of laptops and desktops so that sysprep can "resolve" the correct model. And the best way to do that
regards
Thanks for an excellent write up. I have one problem, when I put this universal image on a laptop and it runs through the entire setup, after rebooting the laptop freezes. I took he hard drive out and connected to my computer via USB, I discovered that the hal.dll changed from 80kb to 140kb. If I change the HAL.DLL back to the original file, the laptop finishes the setup without a problem. How can I prevent HAL.DLL from being overwritten?
upon further investigation I have discovered going to the properties>version>internal name of HAL.DLL the value shows as halaacpi.dll. I know for a fact I put the correct halacpi.dll and renamed it to HAL.DLL. At this time I am trying a few things to see if I can't get this universal image going on this laptop (Latitude D600)
Ian,
Is there a way to bypass a question on setup? It's asking me if I want to overwrite the newer file with an older file. I figured out how to resolve the issue I had, I hacked the dlls with a resource hack and put them into SP2.CAB and DRIVER.CAB, now I'm facing the question if I want to overwrite the file. When I answer YES, the setup continues and completes. If I answer NO, the setup fails.
I resolve my problem. Basically I hacked halaacpi.dll and halapic.dll changing the version to match all the information of halacpi.dll. Installed them into SP2.CAB and DRIVERS.CAB located in c:\windows\driver cache\i386 added OverwriteOemFilesOnUpgrade=Yes to sysprep.ini. By doing this halacpi.dll will be used no matter what file the setup is requesting. By adding the overwrite line in sysprep.ini you're not asked about overwriting any files. Now I truly have one image to go on all the desktops and all the laptops where I work. Thanks for all the information!
Miguel, and about the drivers what u have done?
What are you asking exactly? I did my drivers the same way Bromo suggested with the OemPnpDriversPath. Are you asking how I was able to hack the dll's and put them back into the cab files?
If you would like instructions on how to hack the dll's and put them back into the CAB file, I will have compose a howto for you.
I have a fun one for you guys. I am running Dell XPS Gen 4 and 600. I am trying to create a sysprep image that will work on both. Ive run into the stop 0x7b when trying to deploy the image on an NVidia chipset/SATA. The drivers are properly linked in sysprep.inf but I keep getting BSOD during first boot. HAL has been verified and is working properly. Any ideas how to get the damn thing to pick up the NVidia drivers?
Nice post - liked it and it helped me through some rough spots this weekend.
Wow amazing document man.,. It worked for me..
I have one problem here, after create the image when I push it, its not joining to the specified domain.
Any idea, whats going wrong ?
Instead of using OEMPnpDriversPath, use this nifty utility, put all your drivers in a directory with subdirectorys and use the utility to identify them all and import it to your registry, you can then eliminate the OEMPnPDriversPath from the sysprep.ini file and there's no character limit either!!
http://www.vernalex.com/tools/spdrvscn/index.shtml
Wow, I appreciate you sharing all of this work with us.
I am wondering if I use this method to create a ghost image of a pc, will I be able to deploy the ghost image on any other pc even if it is not the same manufacturer or model. I am asking this because I am the Systems Admin for a small elementary school (about 100 PC's, various models) and I would like to be able to build one universal image that I can use on any computer in the building when something goes wrong. It is very tedious to re-install windows and all of the necessary apps every time a student decides to mess something up. This would be a great time saver, thanks for all of your help.
I am using win7, after customization the system, I use sysprep to seal it, then reboot the system and use Acronic to capture the image. the whole process finished without a hitch, however it won't work on destination computer since the reference and destination computers having a different hardware configuration.
Dear Sir,
Can u mail me the complete sysprep folder after adjustment which u tells in blog.
because i can't able to get the result from the blog.
plzzzzzzzzzz mail me on hrmggrwl@yahoo.co.in
http://adminbromo.blogspot.com/2006/10/universal-ghost-image-guide.html
Post a Comment